Posts

Showing posts with the label gesso

Bingo Fun

Image
Another layout for the numbers and letters cyber crop with White with 1 Challenges . Challenge 1 BIG LETTERS. In May this year I visited with my friend Kathy in Florida USA.  On 16/5/2024 we went to one of the recreation centres in The Villages where she lives to play Bingo - her regular table players welcomed me and were very interested in Australia, several having visited over the years. It cost US$17 for two cards plus several smaller cards. Very different to how I remember playing Bingo in the past and it took me a bit of time to get the gist of the games.  It was fun and much laughter.  I did not win but Kathy and several of the other ladies were lucky.  We did go back later during my visit again no wins! The only big letters I had in my stash were these from many years ago and as I did not have an entire alphabet had to make some creative adjustments.   Thank you for looking, Margaret

Circa 1950 layout

Image
I am trying to catch up with a few March challenges today, it is cold, wet and windy outside today, so a great day to be doing it! This layout was for a challenge over at White with 1  where the challenge is to use white with black. Inspiration mode board to be inspired by. The photo, of my sister (sitting right) and I would have been taken circa 1952 - 70 YEARS AGO!!! We are sitting in a bush furniture bench that our Dad and Grandfather would have made.  It sat for many years on the front verandah of our home.  My sister and I were usually dressed alike, in clothes made by our mother,  and we would have been celebrating a birthday I am sure - I have a few more photos showing us on the bench through the years. Our younger brother would join us a few years later. Here is a close up of the photo on my layout.  I found it difficult locating just the right papers for this layout, and in the end found the background paper you see here (it had a grey tinge that I felt...

Serenity

Image
Today, I layout I have created for another Survivor challenge at Soul Scrappers . This time WATER.  Of course, any survival needs water. The rules were: You must scrap a page as long as it has a reference to water (in any form). Tick - on a walk early morning on a Coffs Coast beach, I found these footprints and a person fishing. Ah, the serenity of it all!! To make your page even more 'watery' (lol) you can add waves, rain drops, splatters, paint drips, bubbles etc. I started with gesso and a palette knife to create the effect of waves (May have got carried away there!) and sand. Next came various sprays from my stash which I sprayed and then used more spray water to get into all the nooks and crannies and elsewhere.  Here is a close up: All papers and embellishments are from Kaisercraft Paradise Found collection. The alphas from my stash.  I kept the layout rather simple as I called the layout Serenity. I love the beach, I live near the beach, I find places...

Shabby Chic Birthday

Image
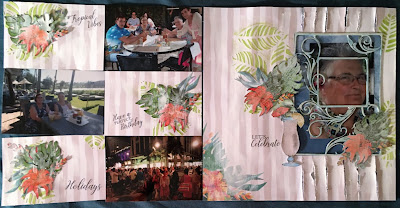
In my post yesterday I shared a single page layout I had created.  I have now added a pocket page to make it a double layout. Close up of the pocket page.  Photos from top right - enjoying dinner, enjoying lunch, enjoying Pearl Harbour parade after dinner.   Isn't that what holidays are all about - enjoyment!  Close up of the main layout. Once again, I have used Kaszazz Resort Collection stamps and papers.  All products used are available from Kaszazz and yes, I am a consultant. Thank you for looking, Margaret

Let's celebrate

Image
Here is a shabby chic layout I have completed.  The photo was taken on my birthday in December whilst in Hawaii.  I have used papers and stamps from Kaszazz Resort collection and all other product used is also Kaszazz.  I started by laying the frame, without any adhesive, onto the striped paper and using pencil marks to indicate where it would lay.  I then cut strips to each of the marks and distressed the edges. See below. A half sheet of blue Designer Paper was then placed behind the distressed edges. The next step was to mix a small amount of Leaf Green Archival Ink into texture paste and then apply though Leaves stencil.  Moving to different angles as I progressed.  I also lifted some of the texture paste from areas between each leaf. For the Flourish Frame I first used white embossing powder (note I did emboss it twice). and then I applied Broken China Oxide Distress ink and then whipped over with a tissue to get affect. For the Flourish Frame ...

Vavau, Tonga

Image
One of the reasons that I joined the Radiance of the Seas cruise that left Sydney on 3rd January, 2018 was that this cruise was a once in a lifetime chance to visit Tonga.  Tonga, featured largely in my childhood, it was a mission outpost and we regularly heard tales of this friendly island in my Sunday School days. Our first port of call in Tonga was Vavau. Settle back sail with me, it is a long post. Vava'u is a group of more than 50 islands, either coral limestone or coral atolls. The main town of Neiafu (known as the Port of Refuge Harbour) is a common destination for yachties sailing the South Pacific.  The waters are known for their clarity, it being said that you can see the bottom at 40 metres. Lots of places to explore tropical forests, limestone cliffs and caves to explore and traditional villages.  Yep, book a tender from ship to Naiafu in the morning and start exploring. The Cruise Compass magazine delivered to the cabin the night before had a forecast of...

Variations on a theme

Image
Another layout to share with you today, this was for a challenge over at Soul Scrappers . It was a lift challenge where you are given a layout (this time by Melissa Kennedy, see below) and you can take from the lift to create your own layout.  You can be inspired by whatever  you see in the layout...stamping, using stencils, texture paste, sprays, a nautical theme, inks, distressing or anything else that you see in the layout. I decided to not go with a nautical theme but take the basic concept of the layout to create mine.  Lots of stash used.  I wanted papers that had a resemblance to Indigenous design on them. This photo of me was taken after I had completed my 3/4 circuit of Uluru recently.   I was truly exhausted, hot and relieved to have a sit in the shade waiting for the shuttle bus.  It was an experience that I thoroughly enjoyed and getting to see Uluru up close and personal was a joy. Here is the inspiration layout by Melissa Kennedy. ...

Scrapbook layouts for fundraising event.

Image
Yesterday, I was the class leader of a scrapbooking day that raised funds for a school in Kissi, Kenya. Here are the layouts that I taught. Many people also contributed to the day with food, donations of goods etc. Thank you to everyone. I do not represent any particular company and use product from many sources.  Where possible today I have indicated those sources.  Melissa Kennedy owner of Unmistakable Creations kindly donated packs of Kaisercraft Marigold papers and stickers to the event.   Here is the first layout that they got to make  - now several of the ladies wanted to make a 'boy' page and in the pack was paper suitable for them to create a male version of the page.    The photo on my layout was taken on our April Cruise with Melissa - why not check out her website Unmistakable Creations  and see what cruises she has coming up. Thank you Melissa for your donation - the ladies loved the papers. This is the second layout they ...

Artist Trading Cards (ATC's) Paris

Image
Today I am sharing 10 ATC's that I have created to be swapped with others over at Soul Scrappers . The theme was Paris. Paris is one of my favourite cities and the Eiffel Tower is iconic to them.  A close up of one of the cards. To make the ATC's I first applied a coat of Gesso to a 12" square piece of regular cardstock and allowed it to dry.  Then I cut into 3 1/2" x 2 1/2" cards.  Next I dabbed 3 colours of acrylic paint to top of each card and using a palette knife 'swooshed' them down and across the card.  These were then allowed to dry before adding gold embossing paste to a butterfly stencil.  Again, left to dry overnight. This morning I stamped a script stamp on the top, and added a die cut Eiffel Tower from gold cardstock which I affixed to the card.  Then I added the Journey stamp, and some doodling and rhinestones completed each card. They are off the USA tomorrow and I will await the return of 9 other cards from the other particip...

South Pacific cruise

Image
Today, I am sharing several layouts I have created on my return from recent Royal Caribbean scrapbooking cruise to South Pacific and Fiji with Unmistakable Creations and led by Melissa Kennedy.  More to come including some of the layouts we created when the ship was at sea. It was my sister's first cruise.  Here we are at Circular Quay - our brother met us for a cup of tea before we boarded and helped to carry our bags to the drop off point. Professional photo of us as we boarded the Explorer of the Seas.   For this layout I applied Gesso, with my hand and fingers,  to the blue background paper.  One of the finds of our cruise was the beautiful Mare Island.  It is the second largest of the Loyalty Islands of New Caledonia. We were on the first tender off the ship and got to explore and walk the beach before the rest of the boat descended onto Yejele Beach. It was great to have the ocean breeze as we wandered on the white sands. Anothe...

Long weekend adventure

Image
This past weekend in Australia was a long one - Queen's Birthday - and I decided at relatively the last minute to go to Scrapbook and Paper Expo in Brisbane, Queensland.  I took the train on Friday - it left Gosford at 4pm and got into Brisbane at 5.30am.  A taxi to my accommodation in South Brisbane, a quick nap, shower and some breakfast I was off to the Convention Centre.  I had booked into several classes and here is some of what I created: I did a class with the fabulous Fiona Paltridge "All my heart" - here is my heart. Great techniques and lots of layering,, gessoing (if there is such a word), spraying, etc - so many techniques thank you Fiona.    Layout created with Colour Blast product.   I need to add a photo and a title. Close up of the cheesecloth that we coloured with Colour Blast Spray - I love how you can see the layers underneath the fabric it really 'popped' the colour. I did two classes with the equally ...

Have I gone bonkers?

Image
Here is a layout I created for a challenge at Soul Scrappers .  The theme was to use a quote from Alice in Wonderland. The other criteria was to use buttons. I will just make it as the closing date is today. I looked up the definition of "bonkers" and was presented with mad and crazy!!!.   This photograph was taken a few years ago in Carcoar, New South Wales.  My sister and I stopped at this garage sale and there were these paddles showing 1st and 2nd - of course, I went a little crazy!!!! Now the story of how this layout came into being.  It started on the weekend when I made this layout To be honest I did not like it....was it the colour? Was it the round patterned paper?  Who knows but I did not feel as though it was something that grabbed me.   This is my 'going bonkers' opportunity!!! So today I took off all the embellishments and the photo and cut the paper into strips and then placed onto a green patterned paper.  I grabbe...

Fun times at Red Rock

Image
Getting my mixed media on!!! I had so much fun creating this page today.  I was wanting to use my lonely Gelatos I am sure they were feeling unused and unloved (Okay I know inanimate objects but you have to smile) when I stumbled across a You Tube video by Fiona Paltridge from May 2014.   I did Gesso the background paper before I started as past experiences with water on patterned paper have not been successful. What did I love about Fiona's layout - the washi tape border it is so reminiscent of the borders I do in my patchwork quilts and I wonder why I never thought of it before!!  I loved the layers of gesso, texture paste, gelatos and stamps. The photos where taken last year at Red Rock on the north coast of New South Wales and I had just successfully crossed a very small stream!!! on the way to the Red Rocks.  The photos are actually a mix of me going and coming back from the rocks. Thank you Fiona for your inspiration, I have left a thank ...

Simply magnificent

Image
One of the most beautiful days I have ever spent was at Mt Titlus in the Swiss Alps.  Endless snow and views for miles.  This photo was taken from a cable car as you wind your way up to the top. I called this mountain here "My mountain" as it was viewable from just about everywhere from Engelberg to the top of the Mt Titlis. I was inspired by a Tic Tac Toe challenge at Soul Scrappers  to create this mixed media page.  Here is the challenge: I selected the right hand column. I first put white gesso onto the patterned paper, let it dry and then sprayed with gold, when this dried I applied a chevron mask and used Distress Ink. The image is definitely frosty/chilly.  For the something recycled I have used the white paper that you get as inserts when you purchase inserts for your layouts - this is sprayed with the gold spray and cut into 2" strips.  I have also used buttons from my collection that I have found at op shops/fetes over the years and...

1970's Bridesmaid

Image
This layout is for another challenge over at Soul Scrappers - to be inspired by the movie poster for Bridesmaids with the added criteria of brick background; white title; number/s on your page can be title or journaling; bridesmaid photo. Here is my layout: It took me longer than usual to bring this layout together - was it the photo? was it the criteria? was it the colour?  The photo is of me being a bridesmaid at my brother's first marriage in the late 1970's.  We hired our dresses (the bride's sister was matron-of-honour).  I also made the bride's going away outfit - yes readers in the 70's a bride would get dressed in a different outfit as they left the wedding.  Brick background tick.  I used gesso and Kaisercraft Brick template.  Now the gesso stuck to the cardstock and when I lifted it off I got this rough edged looked.  I have sponged ink over the resulting brick design to highlight this imperfection.   I hand-made...