Posts

Showing posts from 2023

Budgerigar Card

Image
 This week I created the following card for the ladies at my two community groups that I lead: I used AALL&Create Budgie stamp.  The budgerigar stamp was on special and I think I have an idea why.  Look at the budgie on the right - looks in need of a feed - so I when I gave it a feed using my black marker he looked well fed!   I also used masking of the bird then applied paint 'dabbed on' and when dry a stencil with Black Soot Distress Ozide ink completes the card.  Such a happy card.  Thank you for looking. Margaret
Junk Journal

Image
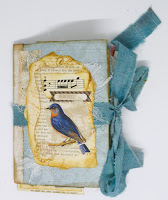
It has been awhile since I last posted - where does time go?  I recently developed and run an introduction to junk journals and embellishments.  I donated part of the small cost to the Community group where I lead classes for their mission efforts. Here are some photos of what I prepared for the participants.  The journal cover was constructed from one 12" x 12" (30cm x 30cm) folded into a smaller size.  My sample shows cotton fabric I coloured with distress and alcohol inks.  Students received tea dyed ribbon. Cover plate features cheesecloth and lace behind the main image - bird from a magazine. The journal on the right was completed by one of the participants in the workshop. We started with a simple tag seen on the bottom.  Next was a simple to construct belly band.  Clusters can also be made along the band and then cut off later for clusters to be used in the journal.  I love the simplicity of these bands that are great for decorating book pages. Next onto collaged belly

A book of Whispers

Image
I recently completed an on-line course with Laly Mille called "A book of whispers".  Here are the photographs of each page.  It turned out a bit more 'clunky' than I intended but I love it. First time doing the book binding - don't think I will be coming out of retirement to be a book binder! Have you read the novel - Bookbinder of Jericho by Pip Williams? To quote a blurb on the novel "The Bookbinder of Jericho is a story about knowledge - who makes it, who can access it, and what is lost when it is withheld. In this beautiful companion to the international bestseller The Dictionary of Lost Words, Pip Williams explores another little-known slice of history seen through women's eyes. Intelligent, thoughtful and rich with unforgettable characters." Thank you for looking, Margaret

Junk Journal Ideas and Inspiration - 20 day challenge

Image
I recently completed the April 20 Day challenge over at Junk Journal Ideas and Inspiration (JJII) on Facebook.  Challenge 12 was "It takes two to tango". In my case black gesso and texture paste are doing the Tango on tea bags. Here is what I created. Left is a greeting card (or page for my junk journal) and right is a small pocket and tag for my junk journal. I loved the idea of the pocket so went ahead and created 8 more as a table gift for a table I was hosting at a local fund-raising Afternoon High Tea.  I filled them with a tea bag (I found some that had a black top) and a roll of Mentos as a sweet treat. A small flower die cut (shortened to fit size of pocket) and a small adhesive word complete the pocket. Here is the process I followed.   I opened up used tea bags that I had dried and removed the tea leaves. Tea residue I put in the compost. Using a paint brush I coloured the tea bag with black gesso and allowed to dry, of course, I was impatient and got out my heat gu

April 20 Day Challenge Day 3

Image
 Day 3 and the prompt was "Back to the drawing board." For the Day 2 prompt I started a embellishment for my junk journal and I did not like what I was making, I was not feeling 'the vibe' and I was very close to tossing it in the bin. It was very thin and I had planned to make a pocket for my journal. So 'back to the drawing board" today - I turned the envelope flap to the back and glued it down The front I covered with a scrunched up napkin and trimmed I then decorated the front - and remember at this stage it was still looking like a possible pocket assembly.  I decided to fold it over my journal page, a little trimming at bottom of envelope was needed, and this created a flap I could place over my journal page.  To this flap I glued another napkin piece as well as a flower to bottom.  See the two photos at start of this entry.  I found this online "Back to the drawing board means that an effort has failed, and it is time to start over from the beginn

April 20 day challenge - Day 2

Image
Day 2 of the challenge over at Junk Journal Ideas and Inspiration - the prompt "Actions speak louder than words". I have taken leftover strips of paper (all sorts) and vintaged them with Vintage Photo distress oxide ink, a very old bottle of Walnut Ink (nearing vintage age itself it was one of the very first things I bought when I started scrapbooking) and water spray. Strips are one of my favourite techniques when making quilts/scrapbook layouts/cards and now junk journalling and art journalling. I have made a pocket and a tag for this challenge. These challenges are really making me think and looking at ways to interpret them. On to Day 3 with the prompt "Back to the Drawing Board" and I wonder where my inspiration when I find it will take me. Thank you for looking, Margaret

April 20 day challenge

Image
No, I am not doing any fitness or diet challenge! I am participating in a 20 day challenge over at Junk Journal Ides and Inspiration Facebook page. Day 1 - the prompt 'A penny for your thoughts. I was recently given a 20th January,1951 English magazine called Home Chat and it was this image introducing a story and 'thought for every day' was a regular feature apparently. What was she thinking of in 1951? I have included some thoughts in the pock I made on the page for a new junk journal I am creating for this challenge. What thought would you put into the pocket? For the challenge we can make anything - clusters, pockets, belly bands so really anything goes so long as it is appropriate for the prompt each day which has a nostalgia feel.  So, let's see what I can create - next prompt is 'actions speak louder than words'. Until then, happy thoughts. Margaret

Heart Threads revisited

Image
I recently posted "Heart Threads" and the techniques I used to create the hearts.  I had a request from one of my students at one of local community groups where I lead card classes to teach technique this week. I needed to rethink several things about the class requirements and decided to ditch the sewing machine embellishments and settled with faux stitching.  As the lace, in my original post, was attached with stitches I decided to use a staple to adhere.  I also reduced the size of the masterboard so as to allow only 3 hearts to be drawn and cut.  These I then adhered to card front.  Again, for left-overs they will die-cut a tab to adhere their greeting. Thank you for looking, Margaret

I love Paris in the Springtime postcard

Image
The final postcard challenge over at Junk Journal Ideas and Inspiration on Facebook. The theme   "Where flowers bloom, so does hope" . Here is my postcard My background is a napkin that I applied with a glue stick over a patterned paper. I have added an old French postage stamp; French Script stamp; and a small round stamp. I have also fussy cut a butterfly and small words and finished with an Eiffel Tour I found in my stash and a little bit of gold foil. I was singing "I love Paris in the Springtime" as I made this postcard and my hope is that one day I will return to Paris and hopefully in Spring when flowers are blooming. Thank you for looking, Margaret  I love Paris in the springtime. I love Paris in the fall. I love Paris in the winter when it drizzles, I love Paris in the summer when it sizzles. Cole Porter 1953 .

Heart threads

Image
I recently viewed a video by  Shanouki Art  that she had posted in Junk Journal Ideas and Inspiration. I was instantly inspired by the video that I decided to 'have a go' as we say here in Australia. This is a long post, so please enjoy my creations. I did not have a large ice-cream container so started with this container - I would say medium sized.  I then took the bits and pieces of paper (including coffee filter paper and old sales tags) and bits of lace that were on or near to my table.   I then went out with brown paper to cover the outside table. Here I am ready to start - notice the small pair of tongs I have put to good use.  The next step was to spray inks of all sorts into the container and 'smoosh' around, adding drops of ink as I went.  I used old sprays I purchased years and years ago and some alcohol inks.  Continue to mix together and used heat gun, to dry, when it became soggy and then continued to add inks.  Now by this time, I realised the container w